高出力半導体レーザーコントローラー
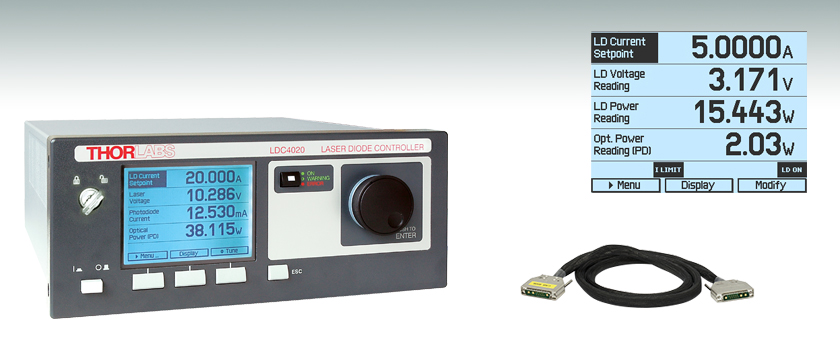
- Control Currents up to 5 A or 20 A
- Excellent Current Stability and Accuracy
- Continuous Wave or Quasi-Continuous Wave Operation
- USB Interface (SCPI)
LDC4020
CAB4006

Please Wait
| Item # | LDC4005 | LDC4020 |
|---|---|---|
| Laser Current Control Range | 0 to 5 A | 0 to 20 A |
| Compliance Voltage | 12 V | 11 V |
| Photocurrent Measurement Ranges | 2 mA / 20 mA | |
| Power Monitor Voltage Measurement Ranges | 10 mV / 100 mV / 1 V / 10 V | |
| QCW* Pulse Width Range | 100 µs to 1 s | |
| QCW* Repetition Rate Range | 1 ms to 5 s (0.2 to 1000 Hz) | |
| Internal Modulation Waveforms | Sine, Square, Triangle | |
| Internal Modulation Small Signal Bandwidth | 20 Hz to 100 kHz | 20 Hz to 50 kHz |
*準連続発振
半導体レーザ用コントローラの特長
- LD電流が5 Aと20 A の2モデル
- アノード接地またはカソード接地の半導体レーザおよびフォトダイオードが動作
- 連続発振(CW)のLEDも駆動可能
- 連続発振または準連続発振(QCW)で動作
- アナログ変調用のファンクションジェネレータを内蔵
- 外部変調用入力端子有り
- LD電流のアナログモニタ出力
- LD電圧測定
- アクティブな出力管理で高効率の光出力
- 互換性のある光学ディテクタ:
- フォトダイオード
- サーモパイル
- センサと増幅器
- パワーメータ
- コントロールモード:
- 定電流制御(CC)
- 定光出力制御(CP)
- 優れた半導体レーザの保護特性:
- LD電流リミット調整可
- LD光出力リミット調整可
- LD過電圧保護機能
- 過度の高温から保護
- インターフェイスとドライバ:
- USB インターフェイス(SCPI 準拠)
- LabWindows/CVI™、LabVIEW™やMS Visual Studio™等の一般的なプログラミング環境用のVXIpnp/VISA ドライバ
LDC4000 シリーズの半導体電流コントローラは、高出力半導体レーザに最大20 Aまでの駆動電流を正確かつ安定に供給します。このシリーズのコントローラは、全ての半導体レーザとモニタ用ダイオードのピン配列に対応しており、定電流モードと定光出力モードで動作できます。このシリーズはスタンドアローン型設計 で、前面パネルのキーと大きくて見やすいグラフィック対応のLCディスプレイ上に表示される操作メニューで直観的な制御が可能です。表示画面の例は、「表示画面」タブ内にあります。これらの特長に加えて、LDC4000シリーズでは、SCPIと互換性のあるUSBインターフェイスを介して完全なリモート制御が可能です。リモート制御を利用すれば、より高度な設定分解能や測定分解能が得られます。
LDC200Cシリーズと比較してLDC4000シリーズでは、大きな電流を供給できると共に、準連続発振(QCW)動作モード、内部変調発生器、サーモパイル入力、LD電圧測定や光出力リミットなどの特性があります。 これらの特性に、新たな設計によって静かで高効率の動作という特長が加わって、LDC4000シリーズの半導体レーザーコントローラは、多くの用途にお使いいただけます。当社ではこれらのコントローラを24か月ごとに校正することをお勧めしております。当社では再校正サービスを提供しております。詳細は当社までお問い合わせください。
「追加情報」タブをご覧いただくと、定電流モードと定光出力モード、フォトダイオードとサーモパイルへのモニタ用入力、連続発振(CW)と準連続発振(QCW)での動作、そして優れた半導体レーザの保護機能に関する詳細な情報が記載してあります。
ドライバーソフトウェア、ならびにSCPIコマンド、LabVIEW™、Visual C++、Visual C#、Visual Basicのプログラミングリファレンスガイドについては「ソフトウェア」タブをご参照ください。
併用をお勧めする製品
TECコントローラ TED4015は、 LDC4000 シリーズのコントローラとの併用に適しています。当社のTECレーザーマウントと組み合わせれば、TED4015の温度安定度は 0.001 °Cのレベルとなります。このレベルでの温度の安定は、半導体レーザの波長調整や原子吸光分析法には不可欠です。
| Laser Diode Accessory Selection Guide | |||||
|---|---|---|---|---|---|
| Temperature Controlled Mounts | Passive Mounts | Passive Mounts with Collimation Package | Strain Relief Cables | Diode Sockets | Other Controllers |
 |  |  |  |  |  |
定電流モードと定光出力モード
半導体レーザは、定電流(CC) または定光出力(CP) モードで駆動できます。CCモードでは、お客様が設定したLD電流が正確に保持されます。このモードは、低いノイズと速い反応速度が必要とされる場合に使用されます。 CPモードでは、光モニタからの信号を利用してフィードバックすることによりレーザ出力を安定化します。レーザ出力値を最大出力以下に抑えたい場合、光出力リミットを設定して制御ループに制限を加えることができます。性能を最大限に引き出すためには、半導体レーザは接地に対応して駆動され、それにより、ノイズ、過渡応答抑制、安定性の面で優れた利点が発揮されます。
20 Aにおける100 µsパルス
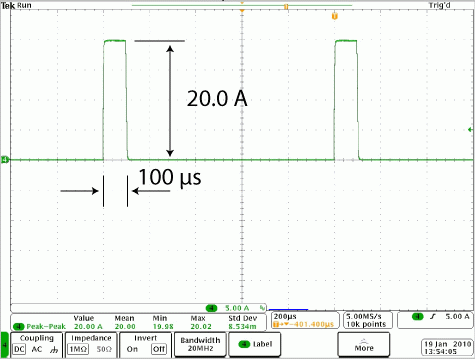
図: LDC4020がQCWモードで動作中に、100 µsの短パルスが20.0 Aで生成された際のオシロスコープを用いたスクリーンショット
フォトダイオードとサーモパイルモニタの入力
LDC4000シリーズでは、半導体レーザの光出力をモニタリングするセンサとして、フォトダイオードかサーモパイルを選ぶことができます。いずれに対してもモニタ用の入力が供給されます。フォトダイオードでは、入力最大電流が 2 mAまたは20 mA のいずれかを選択できます。可変バイアス電圧を印加してフォトダイオードの線形性を改善することもできます。サーモパイルの入力には、最大電圧が10 mV、100 mV、1 V、10 Vの4つの範囲があります。サーモパイルセンサの代わりに、センサ増幅器またはアナログ電圧出力のパワーメータも接続可能です。 いずれのモニタ用の入力も、センサ応答パラメータで校正することで、光出力をmW単位で直接表示できるようになります。
連続発振 (CW) または準連続発振 (QCW) での動作
LDC4000シリーズは、連続発振 (CW) または準連続発振CW(QCW)モードで動作が可能です。LDC4020 は、不要なオーバーシュート無しで容易にシャープかつ正確な20 Aがピーク電流の100 µsパルスを生成します。内蔵のパルス発生器は、内部の可変繰り返し周波数によって、あるいは外部からユニット背面のBNCジャックをトリガとすることができます。
優れた半導体レーザ保護特性
適切な方法でLDを保護するために、LDC4000シリーズは複数の保護機能を有しています。動作モードや印加電圧とは関係なく、精密な電流リミット設定が可能で、設定された最大LD電流を超えて電流が供給されないようになっています。お客様による設定や外部変調によって予め設定されたリミット値を超えて電流が供給されそうになると、LDCは必ずエラー信号を送り返します。 スイッチがONになった時には、ソフトスタートが実行され、電圧過渡ピーク無しで電流がゆるやかに増大するようになっています。ACラインにおける電圧ピークは、電気フィルタ、トランスの遮蔽、適切な筺体の接地で抑制できます。ライン故障が起こっても、レーザ電流は過渡的な影響を受けません。出力がDISABLE状態の時は、レーザは電子的な出力短絡で2重に守られます。電流電源と半導体レーザ間の接続が遮断された場合やレーザ電圧が可変電圧保護閾値を超えると、LD電流はスイッチOFFされます。
| Item # | LDC4005 | LDC4020 | ||
|---|---|---|---|---|
| Front Panela | Remote Controla | Front Panela | Remote Controla | |
| Current Control (Constant Current Mode) | ||||
| Laser Diode Current Range | 0 to 5 A | 0 to 20 A | ||
| Compliance Voltage | 12 V | 11 V | ||
| Setting / Measurement Resolution | 1 mA | 80 µA | 1 mA | 320 µA |
| Accuracy | ±(0.1% + 2 mA) | ±(0.1% + 8 mA) | ||
| Noise and Ripple (10 Hz to 10 MHz, rms, typ. without Noise Reduction Filter) | <250 µA | <10 mA | ||
| Noise and Ripple (10 Hz to 10 MHz, rms, typ. with Noise Reduction Filter) | <50 µA | N/A | ||
| Drift, 24 hours (0-10 Hz, Typical at Constant Ambient Temperature) | <300 µA | <1 mA | ||
| Temperature Coefficient | ≤50 ppm/°C | |||
| Current Limit | ||||
| Setting Range | 5 mA to 5 A | 20 mA to 20 A | ||
| Resolution | 1 mA | 80 µA | 1 mA | 320 µA |
| Accuracy | ±(0.12% + 3 mA) | ±(0.12% + 12 mA) | ||
| Power Monitor Input - Photodiode | ||||
| Photocurrent Measurement Ranges | 0 to 2 mA / 0 to 20 mA | |||
| Photocurrent Measurement Resolution (2 mA Range / 20 mA Range) | 1 µA / 10 µA | 32 nA / 320 nA | 1 µA / 10 µA | 32 nA / 320 nA |
| Photocurrent Accuracy (2 mA Range / 20 mA Range) | ±(0.08% +0.5 µA) / ±(0.08% +5 µA) | |||
| Photodiode Reverse Bias Voltage | 0 to 10 V | |||
| Photodiode Input Impedance | ~0 Ω (Virtual Ground) | |||
| Power Monitor Input - Thermopileb | ||||
| Voltage Measurement Ranges | 0 to 10 mV / 0 to 100 mV / 0 to 1 V / 0 to 10 V | |||
| Voltage Measurement Resolution (for 10 mV / 100 mV / 1V / 10 V Range) | 1 µV / 10 µV / 100 µV / 1 mV | 0.16 µV / 1.6 µV / 16 µV / 160 µV | 1 µV / 10 µV / 100 µV / 1 mV | 0.16 µV / 1.6 µV / 16 µV / 160 µV |
| Voltage Measurement Accuracy (for 10 mV / 100 mV / 1V / 10 V Range) | ±(0.1% + 10 µV) / ±(0.1% + 100 µV) / ±(0.1% + 1 mV) / ±(0.1% + 5 mV) | |||
| Voltage Input Resistance | 1 MΩ | |||
| Laser Power Control (Constant Power Mode) | ||||
| Photocurrent Control Rangesc | 0 to 2 mA / 0 to 20 mA | |||
| Photocurrent Setting Resolution | 1 µA / 10 µA | 32 nA / 320 nA | 1 µA / 10 µA | 32 nA / 320 nA |
| Thermopile Voltage Control Rangesc | 1 µV to 10 mV / 10 µV to 100 mV / 100 µV to 1V / 1 mV to 10 V | |||
| Thermopile Voltage Setting Resolutionc | 1 µV / 10 µV / 100 µV / 1 mV | 0.16 µV / 1.6 µV / 16 µV / 160 µV | 1 µV / 10 µV / 100 µV / 1 mV | 0.16 µV / 1.6 µV / 16 µV / 160 µV |
| Power Limit (Constant Power Mode) | ||||
| Photocurrent Limit Setting Rangesc | 5 µA to 2 mA / 50 µA to 20 mA | |||
| Photocurrent Limit Resolution | 1 µA / 10 µA | 128 nA / 1.28 µA | 1 µA / 10 µA | 128 nA / 1.28 µA |
| Photocurrent Limit Accuracy | ±20 µA / ±200 µA | |||
| Thermopile Voltage Limit Setting Rangesc | 10 µV to 10 mV / 100 µV to 100 mV / 1 mV to 1V / 10 mV to 10V | |||
| Thermopile Voltage Limit Resolution | 1 µV / 10 µV / 100 µV / 1 mV | 730 nV / 7.3 µV / 73 µV / 730 µV | 1 µV / 10 µV / 100 µV / 1 mV | 730 nV / 7.3 µV / 73 µV / 730 µV |
| Thermopile Voltage Limit Accuracy | ±10 µV / ±100 µV / ±1 mV / ±10 mV | |||
| Laser Voltage Measurement | ||||
| Measurement Principle | 4-Wire | |||
| Measurement Range | 0 to 14 V | |||
| Measurement Resolution | 1 mV | 160 µV | 1 mV | 160 µV |
| Accuracy | ±20 mV | |||
| Laser Overvoltage Protection | ||||
| Setting Range | 1 V to 12 V | 1 V to 11 V | ||
| Resolution | 1 mV | |||
| Accuracy | ±50 mV | |||
| Laser Current Monitor Output | ||||
| Load Resistance | >10 kΩ | |||
| Transmission Coefficient | 2 V/A ±5% | 500 mV/A ±5% | ||
| External Modulation Input | ||||
| Input Impedance | 10 kΩ | |||
| Small Signal 3 dB Bandwidth, CC Mode (without Noise Reduction Filter) | DC to 100 kHz (1 Ω Load) | DC to 50 kHz (0.2 Ω Load) | ||
| Small Signal 3 dB Bandwidth, CC Mode (with Noise Reduction Filter) | DC to 6 kHz (1 Ω Load) | N/A | ||
| Modulation Coefficient, CC Mode | 500 mA/V ± 5% | 2 A/V ± 5% | ||
| Modulation Coefficient, CP Mode, Current Sensorc | 200 µA/V / 2 mA/V ±5% | |||
| Modulation Coefficient, CP Mode, Voltage Sensorc | 10 mV/V / 10 mV/V 100 mV/V / 1V/V ±5% | |||
| Internal Modulation | ||||
| Waveforms | Sine, Square, Triangle | |||
| Frequency Range | 20 Hz to 100 kHz | 20 Hz to 50 kHz | ||
| Modulation Depth> | 0.1 to 100% | |||
| QCW Mode | ||||
| Pulse Width Range | 100 µs to 1 s | |||
| Pulse Width Resolution | 1 µs | |||
| Repetition Rate Range | 1 ms to 5 s (0.2 to 1000 Hz) | |||
| Repetition Rate Resolution | 10 µs | |||
| Trigger | ||||
| Input | Rising Edge Triggered, Starts QCW Pulse with Internal Adjusted Width | |||
| Input Level | TTL or 5 V CMOS | |||
| Output | Active High, Tracks Pulse Width | |||
| Output Level | TTL or 5 V CMOS | |||
| Dead Time to Next Pulse | >10 µs | |||
| Digital I/O Port | ||||
| Number of I/O Lines | 4 (Separately Configurable) | |||
| Input Level | TTL or CMOS, Voltage Tolerant up to 24 V | |||
| Output Level (Source Operation) | TTL or 5 V CMOS, 2 mA MAX. | |||
| Output Level (Sink Operation) | Open Collector, up to 24 V, 400 mA MAX. | |||
| Interface | ||||
| USB2.0 | According to USBTMC/USBTMC-USB488 Specification Rev. 1.0 | |||
| Protocol | SCPI Compliant Command Set | |||
| Drivers | VISA VXIpnp™, MS Visual Studio™, MS Visual Studio.net™, NI LabView™, NI LabWindows/CVI™ | |||
| General Data | ||||
| Safety Features | Interlock, Inhibit, Keylock Switch, Laser Current Limit, Laser Power Limit, Soft Start, Short Circuit when Laser off, Adjustable Laser Overvoltage Protection, Over Temperature Protection Temperature Window Protection (only in combination with TED4015) | |||
| Display | LCD 320 x 240 Pixel | |||
| Connector for Laser, Photodiode, Interlock & Laser On Signal | 13W3 Mixed D-Sub Jack (Female) | |||
| Connectors for Control Input / Output | BNC | |||
| Connector for Digital I/O | Mini DIN 6 | |||
| Connector for USB-Interface | USB Type B | |||
| Chassis Ground Connector | 4 mm Banana Jack | |||
| Line Voltage / Frequency | 100 to 120 V and 200 to 240 V ±10%, 50 to 60 Hz | |||
| Maximum Power Consumption | 200 VA | 600 VA | ||
| Mains Supply Overvoltage | Category II (Cat II) | |||
| Operating Temperature | 0 to 40°C | |||
| Storage Temperature | -40 to 70°C | |||
| Relative Humidity | Max. 80% Up to 31 °C, Decreasing to 50% at 40 °C | |||
| Pollution Degree (Indoor Use Only) | 2 | |||
| Operation Altitude | <2000 m | |||
| Warm-up Time for Rated Accuracy | 20 min | |||
| Weight | 5.5 kg | |||
| Dimensions without Operating Elements (W x H x D) | 263 mm x 122 mm x 307 mm (10.4" x 4.8" x 12.1") | |||
| Dimensions with Operating Elements (W x H x D) | 263 mm x 122 mm x 345 mm (10.4" x 4.8" x 13.6") | |||
全ての技術データは、23±5°Cで相対湿度45±15%の条件下で有効。なお、技術データの内容は予告なく変更される場合があります。
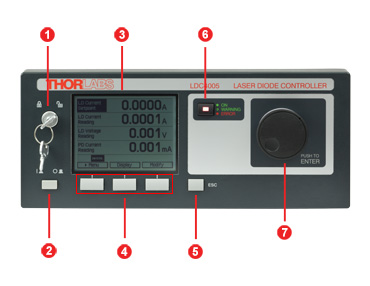
LDC前面パネル
| Callout | Connection | Callout | Connection |
|---|---|---|---|
| 1 | Key Switch | 5 | Escape Key |
| 2 | Supply Power Switch | 6 | LD Status Indicator |
| 3 | LC Display | 7 | Adjustment Knob |
| 4 | Softkeys for Menu Navigation |
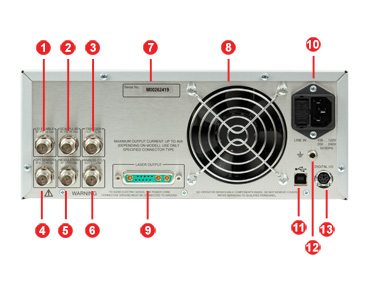
LDC背面パネル
| Callout | Connection | Callout | Connection |
|---|---|---|---|
| 1 | TTL Input "Laser Enable In" 5 V Max | 8 | Cooling Fan |
| 2 | TTL Input "QCW Pulse In" 5 V Max | 9 | LD Output and Optical Sensor Input "Laser Output" |
| 3 | TTL Output "Trigger Out" 0 - 5 V | 10 | Power Connector and Fuse Holder "Line In" |
| 4 | Optical Sensor Input "Opt Sensor In" 0 - 10 V Max | ||
| 5 | Modulation Input "Modulation In" -10 to 10 V | 11 | USB Connector |
| 6 | Laser Current Monitor "Analog CTL Out" 0 - 10 V | 12 | 4 mm Banana Jack for Chassis Ground |
| 7 | Serial Number of the Unit | 13 | MiniDin-6 Jack "Digital I/O" |
13W3 Mixed D-Subジャックの配置
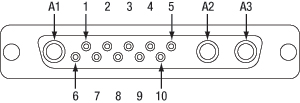
| Pin | Connection | Pin | Connection |
|---|---|---|---|
| 1 | (Thermo) Voltage Sensor Input (+) | 7 | Photo Current Sensor Input (+) |
| 2 | (Thermo) Voltage Sensor Ground (-) | 8 | Photo Current Sensor Ground (-) |
| 3 | Not Connected | 9 | Not Connected |
| 4 | Laser Diode Anode (+) | 10 | Laser Diode Cathode (-) |
| 5 | Output for Interlock and Status Indicator “LASER ON/OFF” (+) | A1 | Laser Diode Ground |
| 6 | Ground Pin for Interlock and Status Indicator “LASER ON/OFF” (-) | A2 | Laser Diode Cathode (with Polarity AG) (-) |
| A3 | Laser Diode Anode (with Polarity CG) (+) |
デジタル I/Oポート
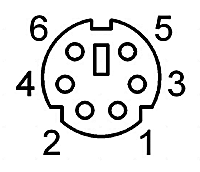
| Pin | Connection |
|---|---|
| 1 | I/O 1 |
| 2 | I/O 2 |
| 3 | I/O 3 |
| 4 | I/O 4 |
| 5 | GND |
| 6 | I/O Supply Voltage (+12 V from internal or higher external voltage up to +24 V) |
LD Enable入力端子
BNCメス
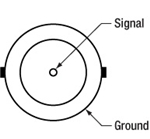
レーザをEnableにする信号入力(HighでレーザON)、TTL 5 V Max
準連続発振(QCW)パルス入力端子
BNCメス

外部トリガ信号入力、TTL 5 V Max
トリガ出力端子
BNCメス

準連続発振(QCW)パルストラッキング出力端子、TTL 5 V
OPTセンサ入力端子
BNCメス

光センサ用入力、 0~+10 V max
変調器入力端子
BNCメス

外部変調信号用入力、
-10~+10 V Max
アナログCTL出力端子
BNCメス

レーザ電流モニタ用出力、0~+10 V
コンピュータ接続
USB B型
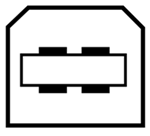
USB B型-A型交換ケーブルが付属
Ground
シャーシグラウンド用4 mmバナナジャック
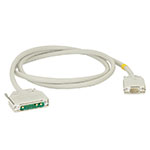
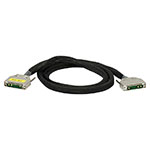
CAB4005&CAB4006 半導体レーザ用ケーブル
このケーブルには、一方にDB-9オスコネクタ、もう一方に13W3オスコネクタが付いています。下図は各コネクタの概略図です。
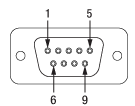
DB-9 オス型コネクタ
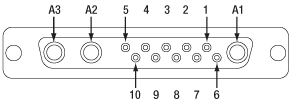
13W3 オス型コネクタ
| Pin Matching | |
|---|---|
| DB-9 Pin | 13W3 Pin |
| 1 | 5 |
| 2 | 8 |
| 3 | A1 |
| 4 | 7 |
| 5 | 6 |
| 6 | 10 |
| 7 | A2 |
| 8 | A3 |
| 9 | 4 |
| Shield | Shield |
| DB-9 オス型コネクタ | |
|---|---|
| Pin | Color |
| 1 | White |
| 2 | Gray and Pink |
| 3 | Gray / Black (2 Wires) |
| 4 | Red and Blue |
| 5 | Brown |
| 6 | Blue |
| 7 | Yellow / Purple (2 Wires) |
| 8 | Green / Pink (2 Wires) |
| 9 | Red |
| 13W3 オス型コネクタ | |||
|---|---|---|---|
| Pin | Color | Pin | Color |
| 1 | No Connection | 9 | No Connection |
| 2 | No Connection | 10 | Blue |
| 3 | No Connection | A1 | Gray / Black (2 Wires) |
| 4 | Red | ||
| 5 | White | A2 | Yellow / Purple (2 Wires) |
| 6 | Brown | ||
| 7 | Red and Blue | A3 | Green / Pink (2 Wires) |
| 8 | Gray and Pink | ||
LDC4000シリーズの画面の例
| 測定画面 | メニュー画面 | ||
|---|---|---|---|
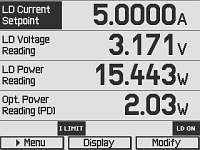 | 測定画面は、測定値やデバイスの状態に関する数値の読み取りが容易で、装置の主な設定値が調整しやすいように作られています。また、適切な文字サイズを選択することで、表示データを2つ、4つまたは6つにすることができます。 | 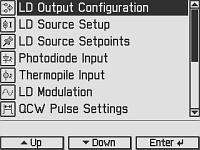 | メニュー画面では、いろいろな動作モードやオプションが選べます。 |
| 半導体レーザーセットアップ画面 | フォトダイオード入力画面 | ||
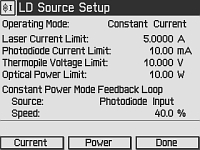 | 半導体レーザのセットアップ画面では、定電流モード/定光出力モードの選択、LD電流やLD光出力のリミット値、定光出力モードでのフィードバックループにおける速度やソースの設定など、重要なレーザ制御用のパラメータが入力できます。 | 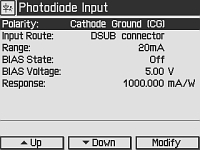 | フォトダイオード入力画面では、フォトダイオードに関する全てのパラメータを入力できます。 |
| QCW設定画面 | 優先事項設定画面 | ||
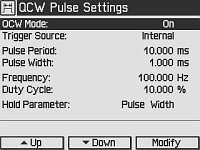 | これは、準連続波(QCW) パルスモード設定の入力画面で、トリガーソースやパルスパラメータが入力できます。 | 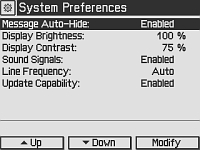 | 優先事項設定画面では、ディスプレイや信号設定などのデバイスの優先事項が設定できます。 |
半導体レーザーコントローラ用ソフトウェア
下図のダウンロードボタンのリンク先には、 VISA VXI pnp™、MS Visual Studio™、MS Visual Studio.net™、LabVIEW™および LabWindows/CVI™のドライバ、ファームウェア、ユーティリティ、そしてITC4000シリーズおよびLDC4000のレーザーコントローラ、小型LDコントローラCLD1000シリーズ、TED4000シリーズのTECコントローラに関連したサポートドキュメントがあります。
ソフトウェアのダウンロードページには、SCPI、LabVIEW、Visual C++、Visual C#、Visual Basicを使用して様々なコントローラを結合させるリファレンスプログラミングノートもご用意しております。詳細やリンク先についてはソフトウェアダウンロードページの「Programming Reference 」のタブをご覧ください。
これらのソフトウェアパッケージは、LabVIEWのバージョン8.5以降をサポートします。お手元のLabVIEWがそれ以前のバージョンの場合は、当社にご相談ください。
LDC4000シリーズ 発送リスト
| Item # | LDC4005 | LDC4020 |
|---|---|---|
| Benchtop Laser Diode Controller, 5 A / 10 V | x | |
| Benchtop Laser Diode Controller, 20 A / 10 V | x | |
| Cable LDC4000/ITC4000 to Laser Mount, 5 A, 13W3, D-Sub-9 (CAB4005) | x | |
| Cable LDC4000/ITC4000 to Laser Mount, 20 A, 13W3, 13W3 (CAB4006) | x | |
| Mixed D-Sub Connector, 13W3, Male & Female with 3 High-Current Contacts Each, 20 A (CON4005) | x | x |
| USB Cable A-B, 2 m | x | x |
| Instrumentation CD Series 4000 | x | x |
| Printed Operation Manual LDC4000 Series | x | x |
| Certificate of Calibration | x | x |
| Posted Comments: | |
进一 严
(posted 2020-11-27 17:32:46.35) I want to control the diode controller from excel. I could reference the TL4000.dll, but it's not a ActiveX component. How to fix this? nreusch
(posted 2020-12-01 10:06:27.0) Thank you for contacting us. I assume you would like to use Visual Basic in Excel. Referencing the Thorlabs TL4000 VXIpnp instrument driver in Visual Basic is the correct approach to successfully implement the driver. Please do so by using an Imports statement as described in the Visual Basic Application note that you can download at https://www.thorlabs.com/software_pages/ViewSoftwarePage.cfm?Code=4000_Series, tab “Programming Reference”. You can then access the functions that are summarized in the HTML manual that you will find on your PC at C:\Program Files (x86)\IVI Foundation\VISA\WinNT\TL4000\manual after having installed the drivers. If you have any questions, please contact your local Tech Support team. Hao Yu
(posted 2020-06-01 00:57:11.14) Your SDK does not support X64 program. Thorlabs.TL4000.dll is a 32 bit dynamic library. MKiess
(posted 2020-06-08 06:59:28.0) This is a response from Michael at Thorlabs. Thank you very much for your inquiry. The 32-bit drivers are installed in a different folder than the 64-bit drivers. The 64-bit version of this instrument driver package installs into your system's VXIpnp directory. This is typically 'C:\Program Files\IVI Foundation\VISA\Win64'. Additional 32-bit libraries install into your 'C:\Program Files (x86)\IVI Foundation\VISA\WinNT'. I have contacted you directly to provide further support. sharrell
(posted 2012-03-06 09:58:00.0) A Response from Sean at Thorlabs: Thank you for your feedback! The ITC current / temperature controllers are essentially a combination of an LDC4000 controller and the TED4015 temperature controller. For example, the ITC4005 will have the same controller specifications as the LDC4005. There is more we can do to simplify the process of selecting the right controller, and we will start by adding a selection guide to our current controller pages, which will list key specifications for our entire current controller line. If you require any further assistance selecting a controller, feel free to email techsupport@thorlabs.com and an applications engineer will be happy to help. user
(posted 2012-03-05 14:26:52.0) I'm picking out current and temperature controllers. It's nice that you have the two ITC specs side by side for comparison, but it would be nice if you also had the specs of the LDC line here for quick comparison. jjurado
(posted 2011-02-16 14:09:00.0) Response from Javier at Thorlabs to zylv: Thank you for contacting us with your request. The LDC4020 shorts the pin A1 A2 and A3 when the laser diode current is not switched on. The shorting of those pins is required in order to ensure that the laser diode has a zero potential difference between its pins, when it is not in use. The fact that you cannot source any current with the driver might be related to a connection problem between the laser diode and the LDC or simply that the polarity is not set properly. We would be happy to help you further with the troubleshooting. I will follow up with you directly. zylv
(posted 2011-02-16 14:02:48.0) LDC4020 could not output the current, I found the Pin A1 A2 and A3 were connected together. could you tell me how fix this issue? This product was dilivered to me yesterday. It is totally new. Thorlabs
(posted 2011-01-19 10:23:34.0) Response from Javier at Thorlabs to aoceron: Thank you very much for submitting your inquiry. The LDC4020 laser diode current controller is designed for benchtop use. We currently do not offer a rack mounting kit for this unit. We do provide, however, 19" rack mounting kits for our PRO8000 chassis, which is designed to hold laser diode test and experimentation modules: http://www.thorlabs.com/NewGroupPage9.cfm?ObjectGroup_ID=895&pn=PRO8000 aoceron
(posted 2011-01-18 22:23:41.0) I was told to use the RK4101 rack-mount kit for the LDC4020, but this wont hold it fix to a 19" rack. Do you have a rack-mount for the LDC4020? or do you have an LDC4020 that is rack-mountable into a 19" rack? Thank you. |
半導体レーザーコントローラーセレクションガイド
下の表は、当社の半導体レーザ用コントローラおよびデュアル半導体レーザ/温度コントローラの主な仕様の一覧です。詳しい内容や仕様について、またはご注文の際には表内の型番をクリックしてご確認ください。
| Current Controllers | ||||||
|---|---|---|---|---|---|---|
| Item # | Drive Current | Compliance Voltage | Constant Current | Constant Power | Modulation | Package |
| LDC200CV | 20 mA | 6 V | External | Benchtop | ||
| VLDC002 | 25 mA | 5 V | - | Int/Ext | OEM | |
| LDC201CU | 100 mA | 5 V | External | Benchtop | ||
| LD2000R | 100 mA | 3.5 V | - | External | OEM | |
| EK2000 | 100 mA | 3.5 V | - | External | OEM | |
| LDC202C | 200 mA | 10 V | External | Benchtop | ||
| KLD101 | 230 mA | ≤10 V | External | K-Cube™ | ||
| IP250-BV | 250 mA | 8 Va | External | OEM | ||
| LD1100 | 250 mA | 6.5 Va | - | -- | OEM | |
| LD1101 | 250 mA | 6.5 Va | - | -- | OEM | |
| EK1101 | 250 mA | 6.5 Va | - | -- | OEM | |
| EK1102 | 250 mA | 6.5 Va | - | -- | OEM | |
| LD1255R | 250 mA | 3.3 V | - | External | OEM | |
| LDC205C | 500 mA | 10 V | External | Benchtop | ||
| IP500 | 500 mA | 3 V | External | OEM | ||
| LDC210C | 1 A | 10 V | External | Benchtop | ||
| LDC220C | 2 A | 4 V | External | Benchtop | ||
| LD3000R | 2.5 A | -- | - | External | OEM | |
| LDC240C | 4 A | 5 V | External | Benchtop | ||
| LDC4005 | 5 A | 12 V | Int/Ext | Benchtop | ||
| LDC4020 | 20 A | 11 V | Int/Ext | Benchtop | ||
| Dual Temperature and Current Controllers | |||||||
|---|---|---|---|---|---|---|---|
| Item # | Drive Current | Compliance Voltage | TEC Power (Max) | Constant Current | Constant Power | Modulation | Package |
| VITC002 | 25 mA | 5 V | > 2 W | - | Int/Ext | OEM | |
| ITC102 | 200 mA | > 4 V | 12 W | Ext | OEM | ||
| ITC110 | 1 A | > 4 V | 12 W | Ext | OEM | ||
| ITC4001 | 1 A | 11 V | > 96 W | Int/Ext | Benchtop | ||
| CLD1010LPa | 1.0 A | > 8 V | > 14.1 W | Ext | Benchtop | ||
| CLD1011LPb | 1.0 A | > 8 V | > 14.1 W | Ext | Benchtop | ||
| CLD1015c | 1.5 A | > 4 V | > 14.1 W | Ext | Benchtop | ||
| ITC4002QCLd | 2 A | 17 V | > 225 W | Int/Ext | Benchtop | ||
| ITC133 | 3 A | > 4 V | 18 W | Ext | OEM | ||
| ITC4005 | 5 A | 12 V | > 225 W | Int/Ext | Benchtop | ||
| ITC4005QCLd | 5 A | 20 V | > 225 W | Int/Ext | Benchtop | ||
| ITC4020 | 20 A | 11 V | > 225 W | Int/Ext | Benchtop | ||
当社では製品組み込み用あるいはラックマウントの半導体レーザ電流&温度コントローラ(組み込み用モジュール、PRO8電流コントロールモジュール、PRO8電流&温度コントロールモジュール)もご用意しております。

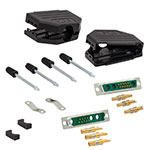
このケーブルは、 LDC4000シリーズの電流コントローラまたはITC4000シリーズの半導体レーザ駆動電流 & 温度コントローラと半導体レーザの接続にお使いいただけます。当社では、ご自身でケーブルのカスタマイズを行っていただけるよう、13W3コネクタのみでも販売しています。CAB4005およびCAB4006のピン配列については、「ピン配列」タブをご参照ください。
尚、LDC4005にはケーブルCAB4005が1本とコネクターキットCON4005が1つ、LDC4020にはケーブルCAB4006が1本とコネクターキットCON4005が1つ、それぞれ付属しています。

| Calibration Service Item # | Compatible Controllers |
|---|---|
| CAL-LDC4 | LDC4005, LDC4020 |
Thorlabs offers a recalibration service for our LDC4000 Series High-Power Laser Diode Controllers. To ensure accurate measurements, we recommend recalibrating the devices every 24 months. The table to the right lists the controllers for which the CAL-LDC4 recalibration service is available.
Requesting a Calibration
Thorlabs provides two options for requesting a calibration:
- Complete the Returns Material Authorization (RMA) form. When completing the RMA form, please enter your name, contact information, the Part #, and the Serial # of the item being returned for calibration; in the Reason for Return field, select "I would like an item to be calibrated." All other fields are optional. Once the form has been submitted, a member of our RMA team will reach out to provide an RMA Number, return instructions, and to verify billing and payment information.
- Enter the Part # and Serial # of the item that requires recalbration below and then Add to Cart. A member of our RMA team will reach out to coordinate return of the item for calibration. Should you have other items in your cart, note that the calibration request will be split off from your order for RMA processing.
Please Note: To ensure your item being returned for calibration is routed appropriately once it arrives at our facility, please do not ship it prior to being provided an RMA Number and return instructions by a member of our team.
 Products Home


 高出力電流コントローラ